
 |
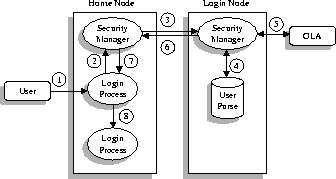
Initially, we consider the following login scenario: a principal accesses a shared workstation by entering a globally unique role name (e.g., remote_tom@cs.washington.edu). This role corresponds to the level of trust the principal places in the login node, and to the amount of rights required to successfully complete the desired tasks, for example, reading mail. Once the role is chosen, the principal trusts the OS of the login node with all the privileges associated with that role, since the OS is free to masquerade as the role (at least for the duration of the granted transfer certificate). The login sequence is described in Figure 4 and is summarized below:
As part of this mutual authentication, the login node transmits a certificate signed by a local system administrator stating that the administrator believed that the login node had not been tampered with at boot time. The home node uses this information to aid in the login authorization decision.
For a successful login, the result of the above sequence of steps is to allow the login node to act on behalf of the role for a time period determined by the home domain's security manager. Any processes spawned by the login shell are by default assigned to the same security domain. The protocols employed to access resources through this security domain are detailed in the next two subsections.
One limitation of the above scheme is that the login node is trusted with the role's password (though not its private key). A well-behaved machine will erase the password from memory as soon as it is transmitted to the home domain. Similarly, the local file and memory cache should be flushed upon logout to ensure that private state is not leaked even if the machine is compromised at a later time. Another limitation with the protocol is that the principal's home domain must be available at the time of login (i.e. no network failures/partitions), or authentication becomes impossible. We believe that both of these limitations are inherent given the current state of hardware/software systems. However, our design also supports the use of specialized, trusted hardware (such as smart cards or a portable computer) to enhance security (keep password from local machine) or higher availability (no need to contact home domain for login) or both.
A trusted hardware proxy, such as a smart card or a portable computer,
can also be used to separate the tasks of authentication (principals
proving their identity) and authorization (determining that the
principal is privileged to login to the remote machine with the
specified role)![]() . The proxy can store both a role's private key and the
associated password to implement a challenge/response protocol at
login as follows
. The proxy can store both a role's private key and the
associated password to implement a challenge/response protocol at
login as follows![]() . When the home domain is notified of a login attempt,
it encrypts a random number in the role's public key and transmits the
result to the login machine's security manager. The proxy prompts the
user for a password needed to decrypt a locally stored (but encrypted)
private key file for the role. The private key is used to decrypt the
number, which is then transmitted back to the home domain. If the
correct number is returned, the process of producing proper transfer
certificates is followed as enumerated above. As a separate
optimization, the task of authorization can be co-located with the
hardware proxy to improve both the performance and availability of the
login process (while trading off centralized autonomy in authorizing
the locations from where particular roles are allowed login).
. When the home domain is notified of a login attempt,
it encrypts a random number in the role's public key and transmits the
result to the login machine's security manager. The proxy prompts the
user for a password needed to decrypt a locally stored (but encrypted)
private key file for the role. The private key is used to decrypt the
number, which is then transmitted back to the home domain. If the
correct number is returned, the process of producing proper transfer
certificates is followed as enumerated above. As a separate
optimization, the task of authorization can be co-located with the
hardware proxy to improve both the performance and availability of the
login process (while trading off centralized autonomy in authorizing
the locations from where particular roles are allowed login).