| ||||||||||||||||||||||||||||||||||||||||||||||||||||
Paper - 2nd Large Installation System Administration of Windows NT Conference,
July 14-17, 1999, Seattle, Washington
[Technical Program]
Radio Dial-in Connectivity to NT Networks Kenneth O. May, P. Eng ISM, a Member of IBM Global Services "Global-village is the world viewed as a community in which distance and isolation have been dramatically reduced by electronic media"; Item #307 (11 Dec 1998 05:00) - global village: M-W's Word of the Day; Web: https://listserv.webster.m-w.com/SCRIPTS/WA-MERRIAM.EXE?A2=ind9812B&L=MW-WOD&P=R242This paper discusses a limited case study of the application of a specialized use of Windows NT dial-in connectivity. to create a global village. Namely a radio link to a telco dial-in connection with a remote modem for network connectivity.
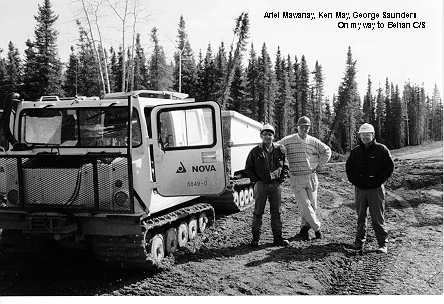
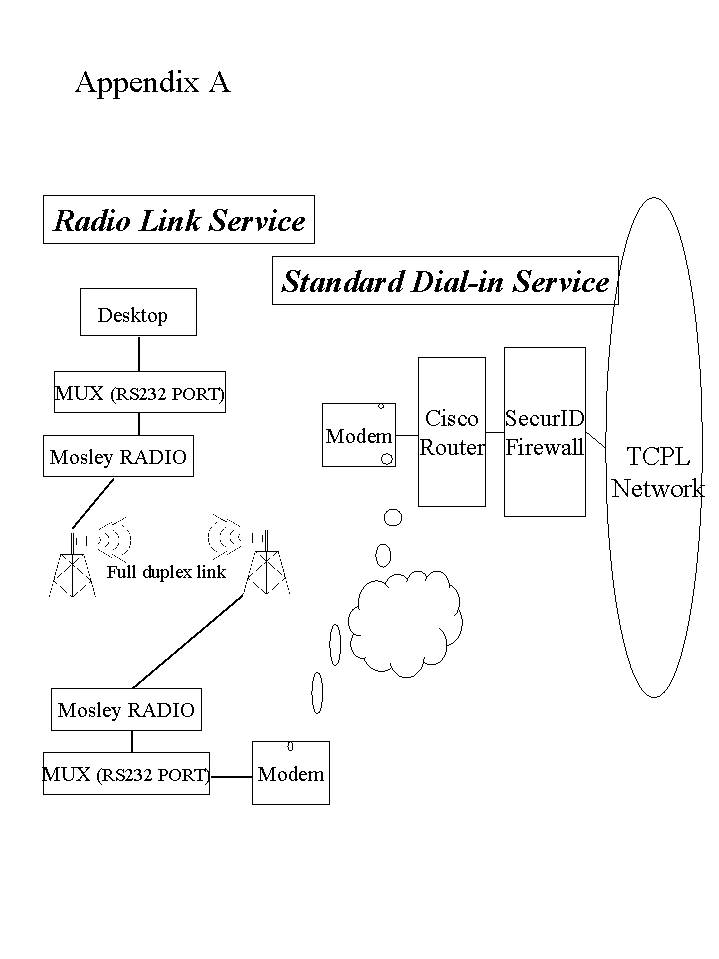
Figure 1 - Travel on muskeg to Behan Compressor Station It's 9 am on a cold January morning. George Walls, a TransCanada measurement tech, is sitting in the Behan Compressor Station waiting for the sun to come up. He just arrived after a 40 minute helicopter ride over the muskeg from the nearest road. Once the sun is up he'll calibrate the meter run at the station, but that's still several hours away since there's only 3 hours of daylight today. He starts his PC and waits until the screen displays "User Name Verified". Now he can read his e-mail, do his expenses, submit his overtime and generally keep himself preoccupied while he waits in the dark. For George, the availability of the NT network is critical to his productivity, personal mental state and the company's productivity. In the far north, with the muskeg surrounding the Compressor station, the lonely technician waits for daylight to venture out to fix the problem at a gas pipeline measurement site. While he's waiting he sits at his one linkage with the outside world, his Network PC, and attempts the dial-in process and hopes the radio link is working. 'Thank God' he says as the screen displays 'User Name Verified' as the final confirmation that he can send and receive email, do his expenses, submit his overtime on his timesheet and keep himself preoccupied for several hours since it's January and there is only 3 hours of daylight anyway. To this technician, a 40 minute helicopter ride from the nearest road, the availability of the NT Network is critical to his productivity, personal mental state, and the company's profitability. The sites are generally located in the top half of Alberta, Canada and isolated by the lack of any other communications methods other than a radio link to the nearest telephone connectivity point. Because of topology and costs, microwave is not a viable option and it's normally many miles to the nearest landline connection. Some of these connectivity points are telephone company sites and some others are shared with by other companies who have similar communications problems. See Appendix A for a high level block diagram of the communications flow. Because of topology and costs, microwave is not a viable option and it's normally many miles to the nearest landline connection. Being a data radio link, the hardware in place restricts the speed is restricted to 19200 baud. Since it is a dial-in the receiving modem has a 20 minute20-minute inactivity monitor and will drop the line after this time. So Tthe main limitation to connectivity is the wait time waiting for things to happen because of the relatively slow speed for running Microsoft Outlook, SAP, Netscape etc. Also, Aas a security policy, the company has restricted dial-in access to their internal web only. Any upgrades to the communications hardware or firmware have to be co-ordinated with the computing support areas to ensure that the system integrity is maintained. Data transferred over this link can affect billing to TCPL's customersfor TCPL. This Problems of this type sets the priority of the access up to high, which is a 2 day2-day response time for these sites. Generally, most of the problems are not of this nature, so that problem response time is from 2 weeks to a month for non-business-critical problems. Reliability of the communications at these sites varies. Some sites require a maintenance visit as little as once a year, while others tend to have up to 8 visits a year. Differences in weather conditions such as high wind areas, power stability and grounding conditions are key factors that affect this reliability.
The oOperating system is NT4.0 with Service Pack 2. RAS setup has UnimodemEnable=0. This is added to the REGEDT32.EXE so that it enables the MODEM.INF file in C:\WINNT\SYSTEM32\RAS directory. This file has to be edited first for the modem type we used, In the same directory, SERIAL.INI must be blank with a single carriage return and RASPHONE.PBK will be edited from the Dial-up Networking Icon in My Computer. A range of manufacturers hardware was used, although primarily Compaq or IBM Pentium 133 MHz or 166 MHz desktop desktop PCs are used. The connection is direct connect with a serial cable to the data radio interface. This connection had to have pins 7 to 8 tied together so thate RAS would recognize the link since the modem was at the other end of the radio link.. Attached as Appendix BA is a set of the instructions we use for the setup procedures for this environment. The target user for these instructions is an IS type person familiar with our NT and normal dial-in configuration, so some of the steps are combined and some actions are implied. We didn't want to make this into a 3 ring 2 inch binder. The gist of the work is to ensure that all references to modem operating speeds are set to 19200 baud. This includes MODEM.INF and RASPHONE.PBK. Additionally, the Control Panel/Modem setting has to be set with speed of 19200 baud, Error Control and Flow Control OFF in the Connection/Advanced area of the modem properties. The reason we do this is to preclude the software sending any parameter changes to the modem as the parameters set by the Automation technicians in the modems at the other end of the radio link are critical to reliable operation of the radio interface. It can also be noted that the modem properties used is are for the AT&T Comsphere3810 Plus. Although other types of AT&T modems are actually used at various locations, the 3810 Plus initialization parameters worked more consistently than any of the others. The Network connection end of the dial-in is a modem bank connected to a Cisco router. Authentication for access is twofold. First, access to the network is validated with a mail serverPOP3 authentication and then the NT name and password are authenticated for the domain. This double authentication seems to provide reasonable security for dial-in since as the only address the can be traced on the network is back to the answering end of the modem bank. (Note this is the company standard dial-in service )
The 9-pin connector on the COM port 9 pin connection must have pins 7 and 8 cross-connected to allow the RTS/CTS control to work properly on the PC. Please see Appendix CB for the signalling configuration of 9 pin to 24 pin modem connections. This The only change is done to disable the Unimodem default configuration for RAS, which automatically enables MODEM.INF as the location for modem configurations based on the type selected. (see Appendix B for change details) Select Hkey_Local_Machine Click on Software Click on Microsoft Click on RAS Click on Protocols From the Menu bar select EDIT and then ADD VALUE In the Value Name box type in EnableUnimodem NOTE: The above IS case sensitive with NO spaces. In the Data type box change to REG_DWORD In the DWORD editor window type in 0(zero) as the data Click OK Before the above changes above are done, and Service Pack 2 is reloaded , the C:\WINNT\SYSTEM32\RAZ\SERIAL.INI file must be checked to ensure that it is emptyied. Another critical file which should be checked is C:\WINNT\SYSTEM32\RAS\MODEM.INF for the specified modem to ensure that the initialization string in use does not reset the modem parameters. as Tthese had to be custom configured at the modem site at the end of the radio link for the telco interface at that site. This was done in our situation case study by Trans Canada Pipeline's Automation technicians who are trained in this environment.
Appendix A is the definitive list of tasks associated with setting up our Comsphere modem for the Radio Link dial-in sites. The order of the tasks is critical, for example if one changes the Modem.inf file, the RAS needs to be reloaded and Service Pack 2 rerun.
C:\winnt\system32\ras\modem.inf C:\winnt\system32\ras\serial.ini C:\winnt\system32\ras\rasphone.pbk C:\winnt\system32\ras\switch.inf Registry via c:\winnt\system32\Regedt32.exe
This limited case study was not a test. These were all real operational situations which had to work. The result was that, to date, all of these locations are up and operational on a day-to-day basis and they provide the network connectivity needed to meet Trans Canada's business requirements. The primary learning from this experience is that in a networked environment, it takes a range of knowledge and skills to establish and maintain the integrity of the communications. Many people with diverse skill sets are often required to work together to ensure that even the most remote user has the access required to do his or her job effectively. In our case, it was Windows NT skills, communications integration skills, radio connectivity skills, the and most important, people skills to bring it all together. The challenges are to maintain the integrity of this connectivity as software and hardware upgrades are implemented. Such as the implementation of WindowsNT Service Pack 4. An ongoing challenge is to understand and, if possible, control the exact signal expectations of WindowsNT RAS service as it passes in and out of the COM port to the modem.
Respectfully submitted, Kenneth O. May, P Eng For those who helped and provided information and guidance, a special thanks to: TransCanada Pipelines Automation Technicians Al Ouelllette and Kevin Strate of Edmonton, Alberta, and Bill Smith and Pascal Andriano of Fairview, Alberta. ISM and its contractors Aain Ramcharan, Jana Kolot, Henming Lee, Kelly Fortier and Norm Bujold of Edmonton, Alberta, and Soon Ang of Calgary, Alberta. SystemHouse Ltd. Ray Peters of Calgary, Alberta
Appendix BA DIAL-UP Networking Configuration Setup for Radio Linked Sites.
Follow the RAS setup steps outlined on page 2-41 Titled Installing RAS (for Telecommuters). * Note: IF RAS detects a Standard Modem - just continue. The modem will be manually changed later The following procedure will replace the steps from Step 13 and onward. At step 13 Restart the PC/ LAPTOP. *Note: RAS needs to be configured to use the Modem.inf instead of the Unimodem. *Warning: BE CAREFUL in editing the following Registry Entries.
After the PC has restarted continue with pages 2-42 and 2-43 to complete the setup. NOTE:
Appendix CB 9 -Pin Cabling for Mosley Radio sites. The following table shows how to connect a 9-pin serial port connection on a computer to a 25-pin connector on a modem. Again, if you are using an off-the-shelf cable, be sure all the pins are connected as shown in the table. Note that some modems have the Data Set Ready (DSR) signal physically tied to the Data Carrier Detect (DCD) signal. Some 1220-bps modems and other 2400-bps modems have dip switches default to this setting as well. As a result. If such a modem loses power while listening for a call, the Remote Access server cannot detect the condition because the DSR will not change as it does with other modems.
Figure 1 - 9 pin to 25 pin chart |
|
This paper was originally published in the
Proceedings of the 2nd Large Installation System Administration of Windows NT Conference,
July 14-17, 1999, Seattle, Washington, USA
Last changed: 28 Feb 2002 ml |
|